PRENATAL POSTURE GUIDE
Did you know that you might be able to reduce your risk of a diastasis recti or make your postpartum rehab easier during your pregnancy? Did you also know that many of your pregnancy aches and pains can be prevented and/or resolved on your own? Although prenatal exercise classes and bodywork can be important for dealing with the physical and mental demands of pregnancy, these classes and treatments usually occupy a very short amount of time in your life. It is important to think about how you are moving and carrying yourself for all of the time you aren't in these sessions and to work on changing your movement patterns throughout your day. You might be able hold your bodywork adjustments for longer, or perhaps even reduce the frequency of your visits. There are many other added benefits to finding a well-balanced posture, including having more ease while breathing, increasing the likelihood of optimal fetal positioning, and a strong and supple pelvic floor.
Below, you will find some information to remind you of the material covered during my Prenatal Alignment Workshop or private sessions. The information is designed to help you find your "home-base" for standing and moving so that your bones can do their job to hold you up against gravity and your muscles can be organized in a way that helps you naturally get stronger as your body grows. Be sure to visit my Postpartum Alignment and Exercise Guide after you have your baby (or if you already have one!) for tips on baby carrying and recovery.
Feel free to follow up with me or join a digital prenatal exercise group if you have any questions. If you didn't come to a workshop but are interested in having more details about the information below, you can book a prenatal private session with me to get more detailed information.
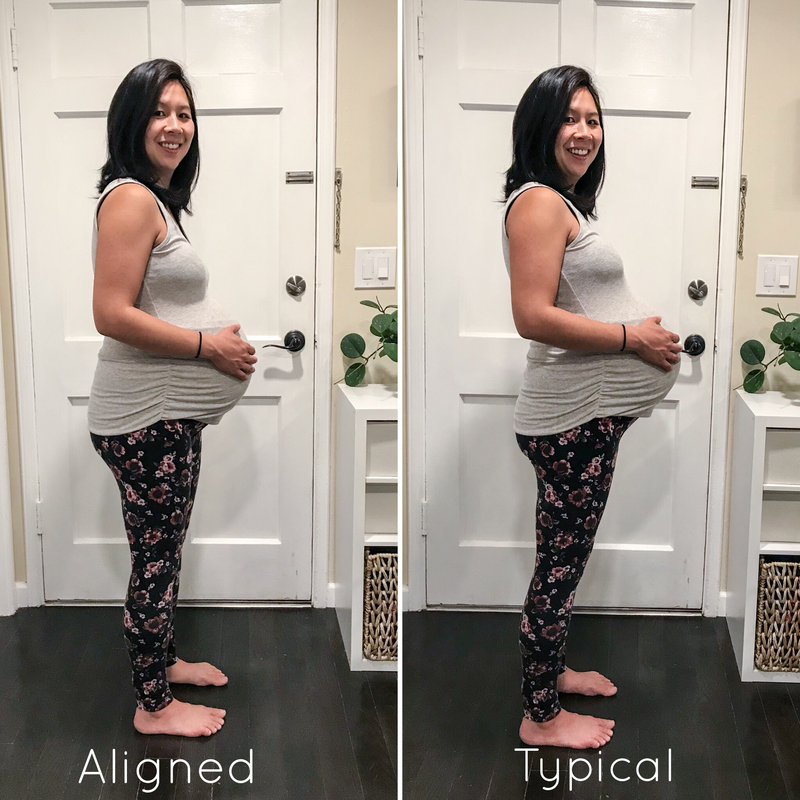
Can You Spot the Differences?
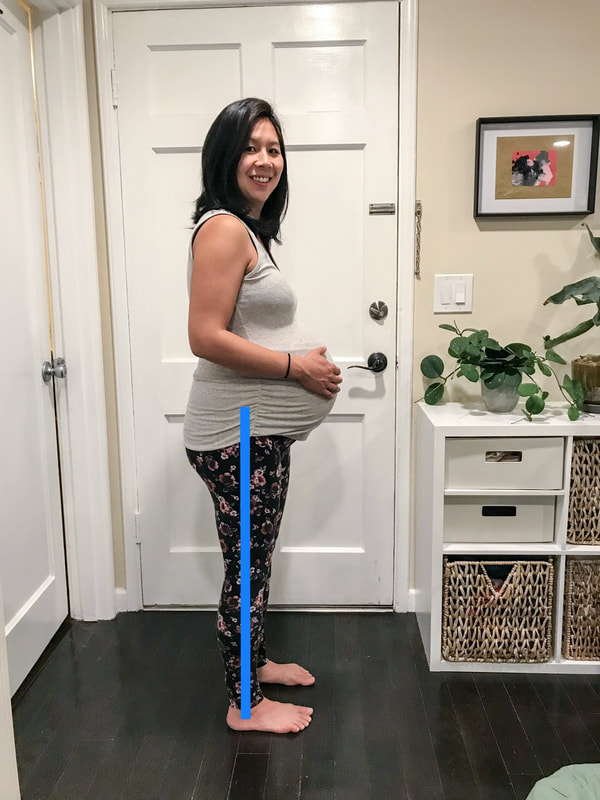
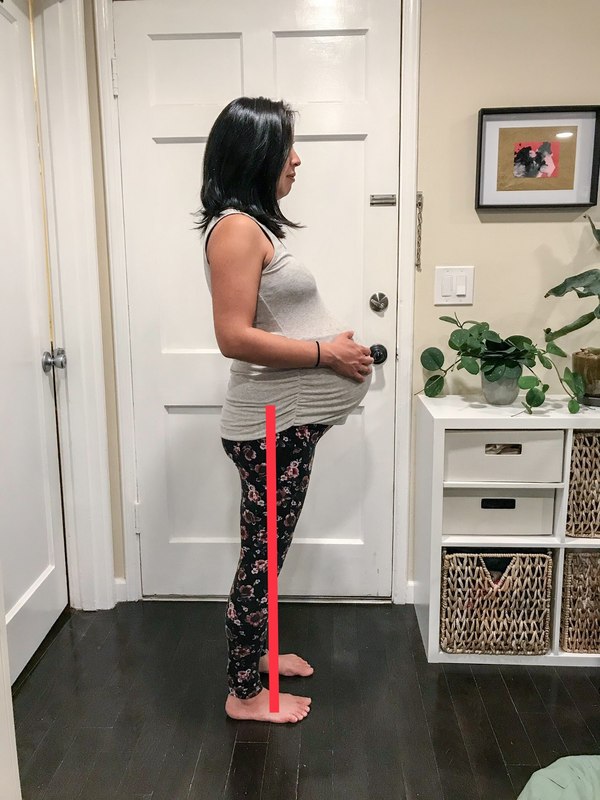
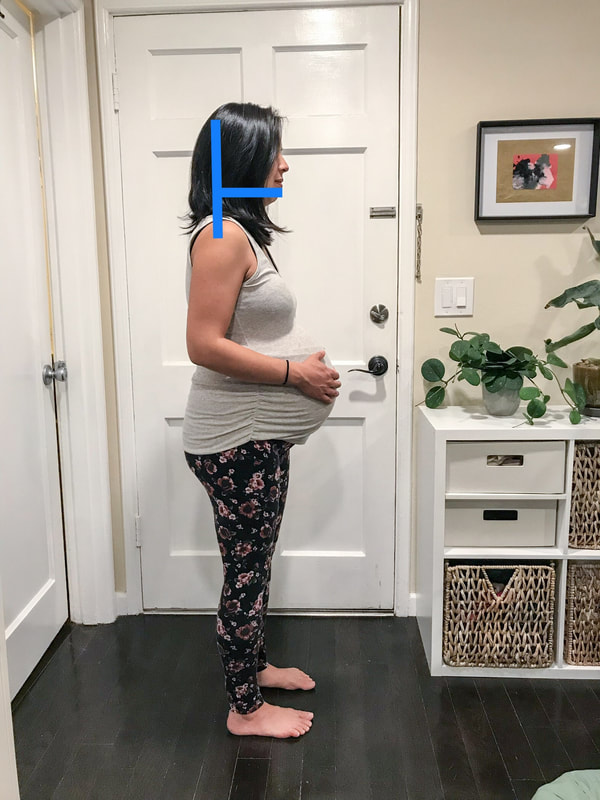
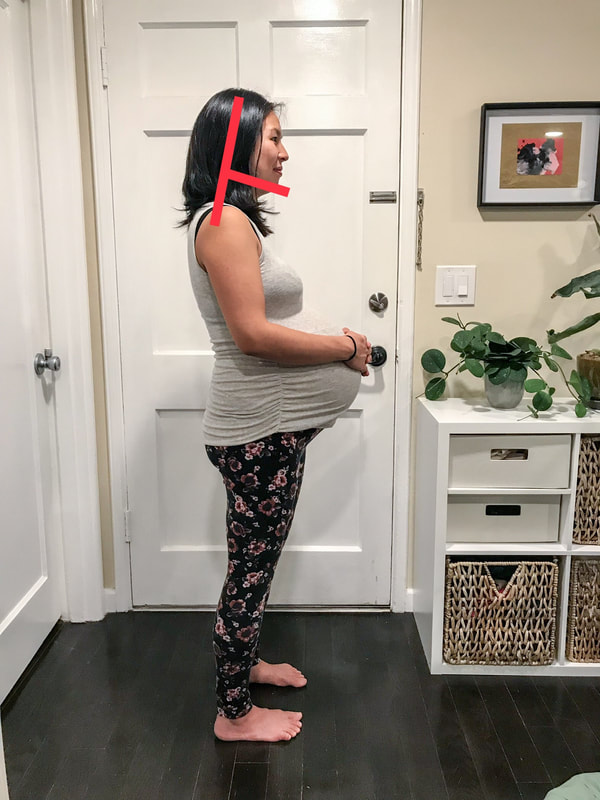
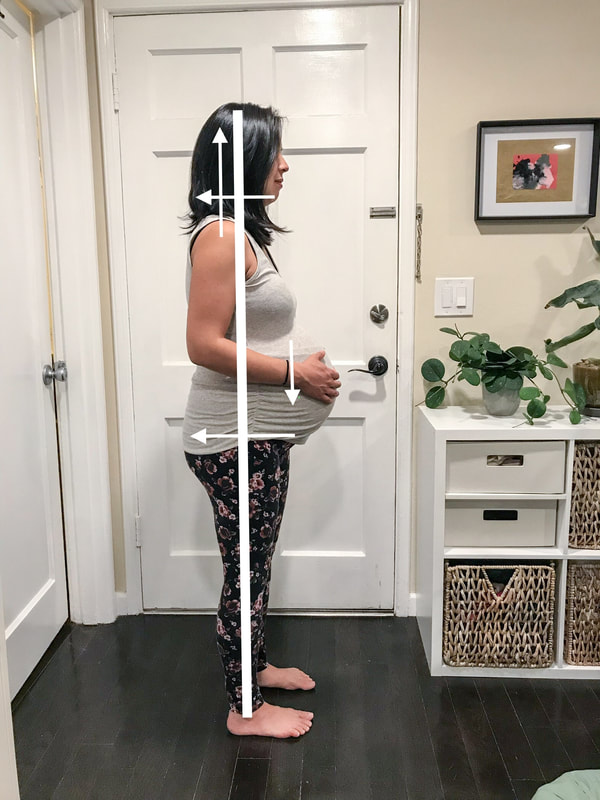
Although these two pictures may look very similar, the first shows an "aligned" stance where my head, ribcage, pelvis, leg, and feet bones are stacked in a way that requires less exertion from my muscles to hold me. As a result, my muscles in all those areas hurt less than they might otherwise. In addition, there is less stress on my linea alba, the connective tissue in the middle of the abdominal muscles that can separate during pregnancy. The second picture is how many women naturally stand as their bellies grow because the weight of the belly wants to pull our bodies forward. When I started to feel some pain in my upper back, pelvis, or low back (usually after a big growth spurt) during my pregnancy, I would look at myself in the mirror and try to bring myself back to my aligned stance, and was often able to find relief. The other benefit of keeping yourself in the "aligned" stance is that it places your muscles in the most functional position, which allows key muscles like your glutes (butt) and hamstrings to grow stronger naturally and help hold your body upright as your belly grows bigger.
Step 1: Legs Hips Distance Apart
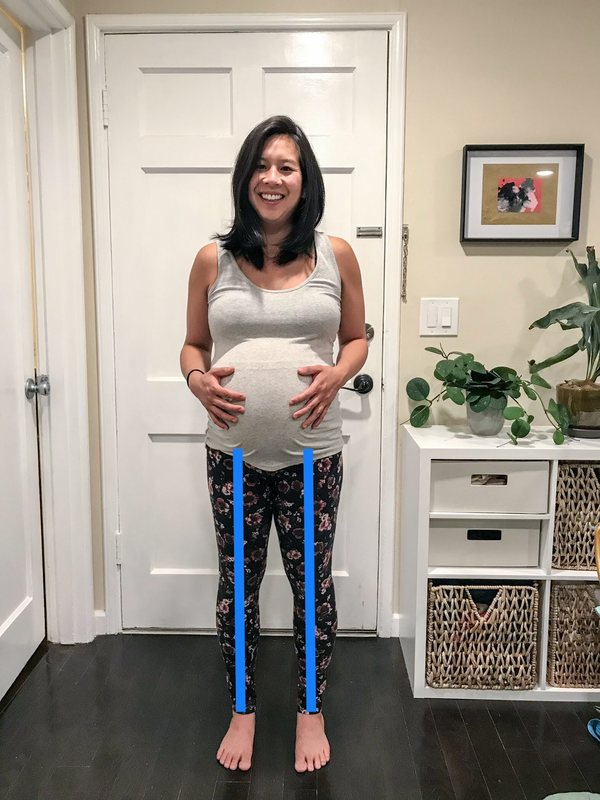
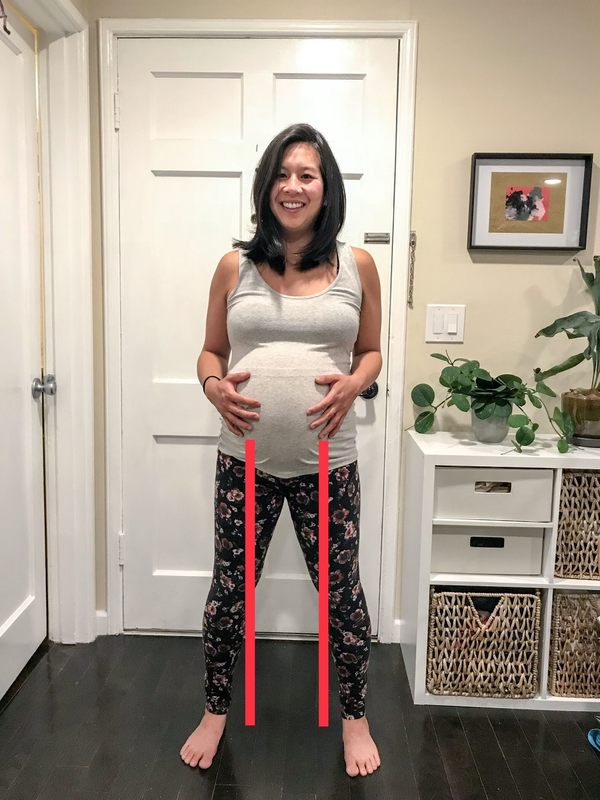
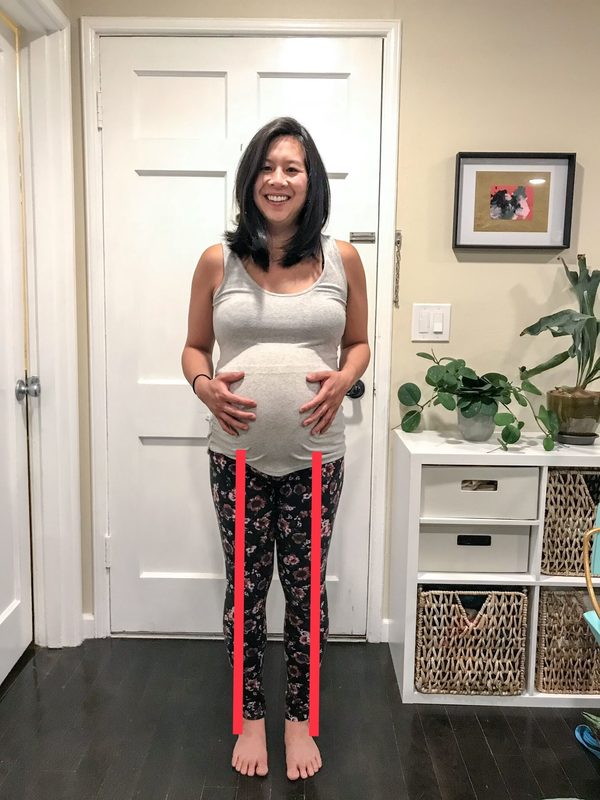
The first alignment point is to keep your feet hip distance apart. In the left picture, my pelvis, knees, and ankles are in line with each other. In the center picture, where my feet are too wide apart, my pelvis is in line with the inside of my knees and feet. In the right picture, where my feet are too narrow, my pelvis falls is in line with the outside of my knees and feet.
Keeping your feet hip distance apart keeps your leg bones stacked to best support the weight of your pelvis and growing belly -- you can think about the integrity or strength of a straight stack of building blocks versus one that is built staggered sideways. Most women naturally stand with their feet wider during pregnancy, like in the second picture, because a wider base makes you feel more stable as your mass grows. The problem with this as a long term solution is that it puts strain on your legs and pelvis, which can lead to pain in the back of your pelvis, the front of your pelvis, and other issues like sciatica. It also prevents your leg muscles from functioning optimally, so you aren't in a position to strengthen and lengthen your muscles naturally as your body changes. Some women who stand very narrowly before pregnancy still continue to stand narrowly during pregnancy. Even though it's in a different direction than the second picture, it still takes your leg muscles out of their optimal position, and can thus lead to pelvic instability or pain. Not pictured here, but also common, is jutting your hip out to one side. All of the same issues apply!
To find the correct distance your legs should be apart, stand in front of a mirror and place your hands on your hip bones. Then, following the ridge of your pelvis, start to move inward with your fingers towards your pubic bones until you find a sharp point, or a place where it feels like your bone starts to curve downwards. This is your ASIS (anterior superior iliac spine). If you're still not sure, you can google an image to see what it is you're feeling for. If you are later on in your pregnancy, you may have a harder time being able to feel this while standing up, so you can try lying down on your side or back to locate this boney marker. Then, using a yoga strap, belt, or weighted string, line your knees and ankles up under your ASIS. Ta-da!
Step 2: Pelvis Over Ankles
In the left picture, the middle of my hips lines up over my knees and my ankles, whereas in the right picture, my hips are forward of my ankles, shifting my weight forward. The bones don't hold my weight as well in the second picture (remember the building blocks example). This forward posture puts strain on the thighs instead of letting my glutes and hamstrings support me from the back side of my body. Another unfortunate side effect is that a lot of pressure sits at my pubic bones in the front of my pelvis and on the back of my pelvis at the SI-joint. Women who have with public synthesis pain or SI-joint dysfunction during their pregnancy are often in this forward posture when standing, sitting, or laying down.
The easiest way to assess this in yourself is to stand next to a full length mirror and take a yoga strap, belt, or weighted string and see how it lines up against your knees and ankles. Often, the side seam of your pants can give you the same type of information if you happen to have one on your pants. Most likely, you will have to back your hips up from forwards of your feet to over your ankles to get aligned. You might also feel like you are sticking your butt out behind you--if so, hopefully you'll feel your glutes and hamstrings working! If you feel your knees locking or your thighs gripping to take yourself to this position, take it back a little bit at a time, trying to ask your glutes and hamstrings to kick in while asking your quads to relax. A lifetime of standing in the forward posture takes a lot of time to undo, so be patient with yourself and never force anything that feels uncomfortable.
You might notice that you feel like you are going to fall over with your torso when you make this adjustment. This is because the forward posture often results in jutting your ribs out to counterbalance the forward shifted weight in the pelvis. This brings us to our next step!
Step 3: Drop Your Ribs
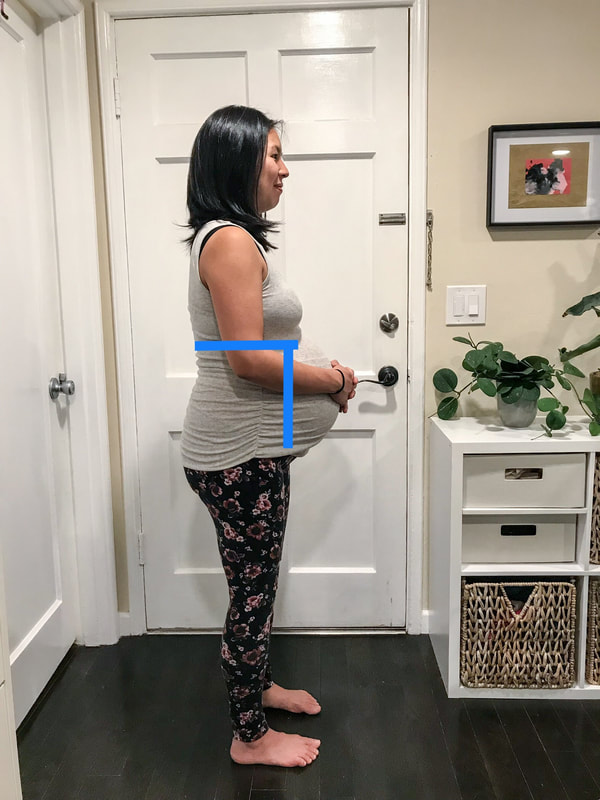
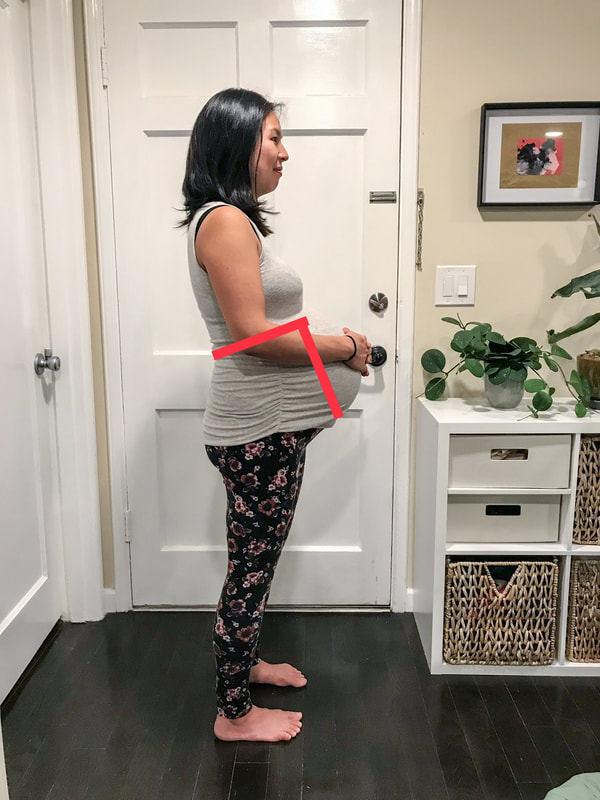
In the aligned stance, the front and back ribs are roughly in line with each other, and the front ribs are also in line with the front of my pelvis. In the right picture, the front of the ribs are thrusted forward and up at an angle. This position of the ribs puts a lot of tension on your upper back, lower back, and pelvis. All that tension leads to your back overworking, your abdominal muscles underworking, and a lot of strain in both the front and back of your body.
Although this adjustment is harder to see and assess on your own, a way that I describe it is to find length in your spine, starting from your low back to your head, and then just relax your ribs down and in towards your back, almost like you are slumping. The key to this one is find the position with ease, and not any forcing! Hopefully, you will feel like the tension in your low back releases. You might also feel like you are drooping forward with your head and shoulders forward of your chest. This is because lifting your chest up masks the true kyphosis (or hunched forward position) of your upper spine. In addition, your head often has to thrust forward when your ribs are lifted just to be able to see straight ahead. This brings us to Step 4!
Although this adjustment is harder to see and assess on your own, a way that I describe it is to find length in your spine, starting from your low back to your head, and then just relax your ribs down and in towards your back, almost like you are slumping. The key to this one is find the position with ease, and not any forcing! Hopefully, you will feel like the tension in your low back releases. You might also feel like you are drooping forward with your head and shoulders forward of your chest. This is because lifting your chest up masks the true kyphosis (or hunched forward position) of your upper spine. In addition, your head often has to thrust forward when your ribs are lifted just to be able to see straight ahead. This brings us to Step 4!
Step 4: Lengthen Your Neck and Draw Your Chin Back
Having your head slouched forward places tension around your neck and your upper back. In an effort to fix our "slumping forward," many people thrust their ribs up and mask the issue, rather than actually making any real changes. To address this issue, think about lengthening the back of your neck while drawing your chin back, almost like you are making a double chin. The key is to try to do this without letting your ribs thrust up! It's ok if you don't get all the way back; any change is progress. Doing stretches for your upper body, as well as the rhomboid push-ups in my postnatal alignment guide can help you get to this position over time. Don't worry too much about where your shoulders end up after all these adjustments and focus on the points that have been discussed instead.
Note: To help address some of that tightness in your neck and upper shoulders, you can also use this alignment cue as a starting point for neck stretches. Drop one of your ears toward your shoulder on the same side and hold it for a moment and then switch sides. Rinse, repeat, etc.
Note: To help address some of that tightness in your neck and upper shoulders, you can also use this alignment cue as a starting point for neck stretches. Drop one of your ears toward your shoulder on the same side and hold it for a moment and then switch sides. Rinse, repeat, etc.
Summary
- Start with your feet hip distance apart. Your feet should line up under the two bony points at the top of your hip bones (ASIS).
- Place the center of your pelvis over your knees, and place your knees over your ankles (follow your pants seam as a guideline). You'll likely have to back your weight up. See if you can lift your toes as a test.
- Drop your ribs so the bottom tips of your ribs are in line with the two bony points at the top of your hip bones (ASIS).
- Lengthen the back of your neck and draw your chin in.
- Breathe into the back of your rib cage and don't be too rigid! It's hard to keep this position while moving around, and any improvement is great. Remind yourself to come back to this position as a starting point whenever you remember and/or find yourself standing around. You can think of returning to this position as a little exercise rep during your day, rather than a static position to be in all the time.
A Note on Diastasis Recti
Although some degree of diastasis recti (abdominal separation) is inevitable during pregnancy, keeping these alignment points in mind as best as you can can prevent a diastasis recti that requires rehab after pregnancy. In addition, be mindful of positions where you are rounding your back and coming up against gravity or lifting something heavy. This position of your spine under load can exacerbate your diastasis recti by increasing intra-abdominal pressure. Examples of these postures are traditional crunches, curling up to get out of bed, and bending over with a rounded spine to pick up groceries, laundry, or anything heavy. When getting up from the ground or bed, try to roll to your side first instead of coming straight up. When lifting heavy things, try to think about doing a hip-hinge while keeping your butt back. Here is an article that describes the hip hinge in more detail.

