POSTNATAL POSTURE & EXERCISES
Although we spend a lot of time nurturing ourselves when we are pregnant, we often neglect our bodies once the baby has been born. In addition to recovering from the pregnancy and birthing process, caring for a baby (and all the gear!) is taxing on your body. Below, you will find some information to remind you of the material covered during my Postnatal Workshop. The alignment guides and exercises can help you stay pain free and reconnect to your core.
Feel free to follow up with me or join a digital postpartum exercise group if you have any questions. If you didn't come to a workshop but are interested in having more details about the information below, you can book a postpartum private session with me to get more detailed information.
Feel free to follow up with me or join a digital postpartum exercise group if you have any questions. If you didn't come to a workshop but are interested in having more details about the information below, you can book a postpartum private session with me to get more detailed information.
Alignment Guidelines
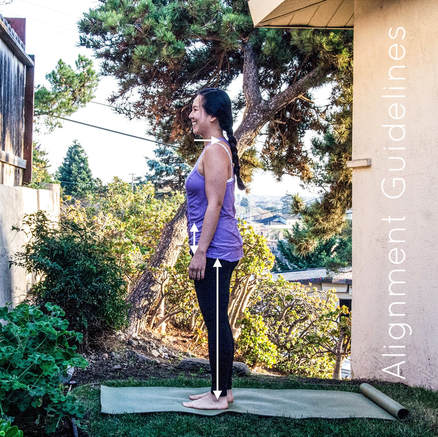
Start with your feet hip distance apart. Your feet should line up under the two bony points at the top of your hip bones (ASIS).
Place the center of your pelvis over your knees, and place your knees over your ankles (follow your pants seam as a guideline). You'll likely have to back your weight up. See if you can lift your toes as a test.
Drop your ribs so the bottom tips of your ribs are in line with the two bony points at the top of your hip bones (ASIS).
Lengthen the back of your neck and draw your chin in.
Use these alignment guidelines as a general guideline for your day-to-day movement. Remember to breathe into your whole rib-cage without changing these points (especially the back!).
Try to keep this alignment as you reach your arms up to touch a doorframe, stretch your arms behind you, or twist your upper body away from your pelvis. All of these movements are extra exercises you can add to your routine. For more detailed information about alignment in general, I recommend Katy Bowman's book, Diastasis Recti: The Whole Body Solution to Abdominal Weakness and Separation. For more information about my alignment point instructions, see my Prenatal Alignment Guide. Even though you're not pregnant anymore, the same information applies!
Baby Carrying
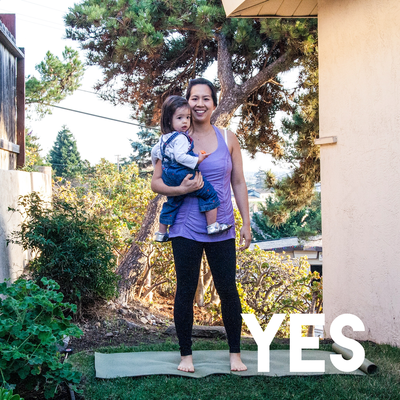
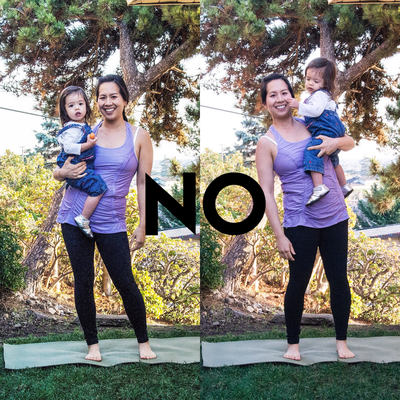
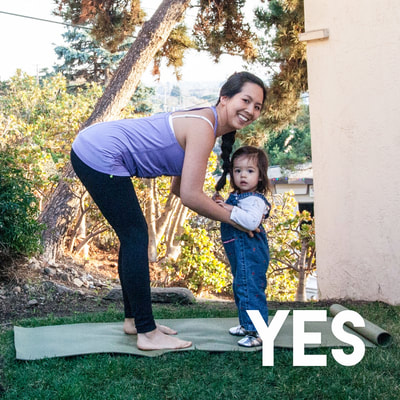
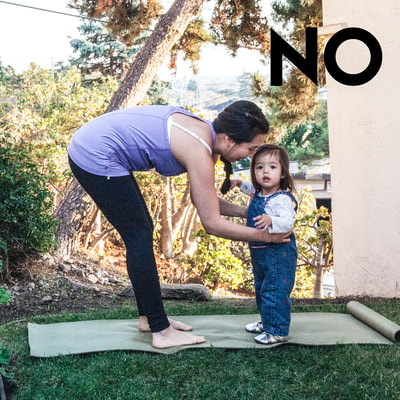
Keep your alignment guidelines in mind when lifting and carrying your baby. Try not to shift your hips or ribs around. To keep your body in alignment, you'll have to use more of your arm strength and think about your core.
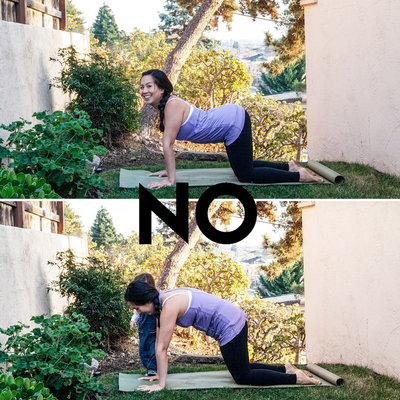
Quadruped (Hands and Knees) Alignment
Place your hands under your shoulders and your knees under your hips. Try to find a "neutral spine," where you aren't tucking your butt under you or sinking into your ribcage. You should feel a bit of support in your belly and a small curve in your back. This takes practice to find, so don't worry about getting it perfect right away. Practicing in front of a mirror is really helpful.
Practice exhaling through your mouth making a soft "hhhh" sound to feel your transverse abdominals (TVA) engage. It should feel like a soft lift of the belly or muscles wrapping in around your spine. Resist tucking your butt under you or rounding your back to feel your core, Also, don't suck your belly in too deeply.
Practice exhaling through your mouth making a soft "hhhh" sound to feel your transverse abdominals (TVA) engage. It should feel like a soft lift of the belly or muscles wrapping in around your spine. Resist tucking your butt under you or rounding your back to feel your core, Also, don't suck your belly in too deeply.
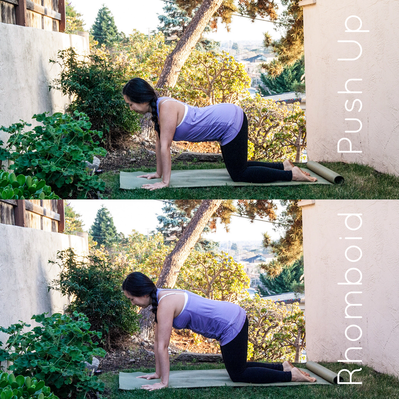
Rhomboid Push-Up
|
Find your neutral spine (see above).
Let your head, pelvis, and belly relax down without rounding or arching your back. You should feel your shoulder blades releasing together (but don't squeeze them together!). Press into your hands to lift your spine up, and feel your shoulder blades spreading apart. Your head should still be relaxed, even though mine isn't in the pictures to the left. Repeat the above 10-12x. I suggest pairing this exercise with a pec/chest stretch. |
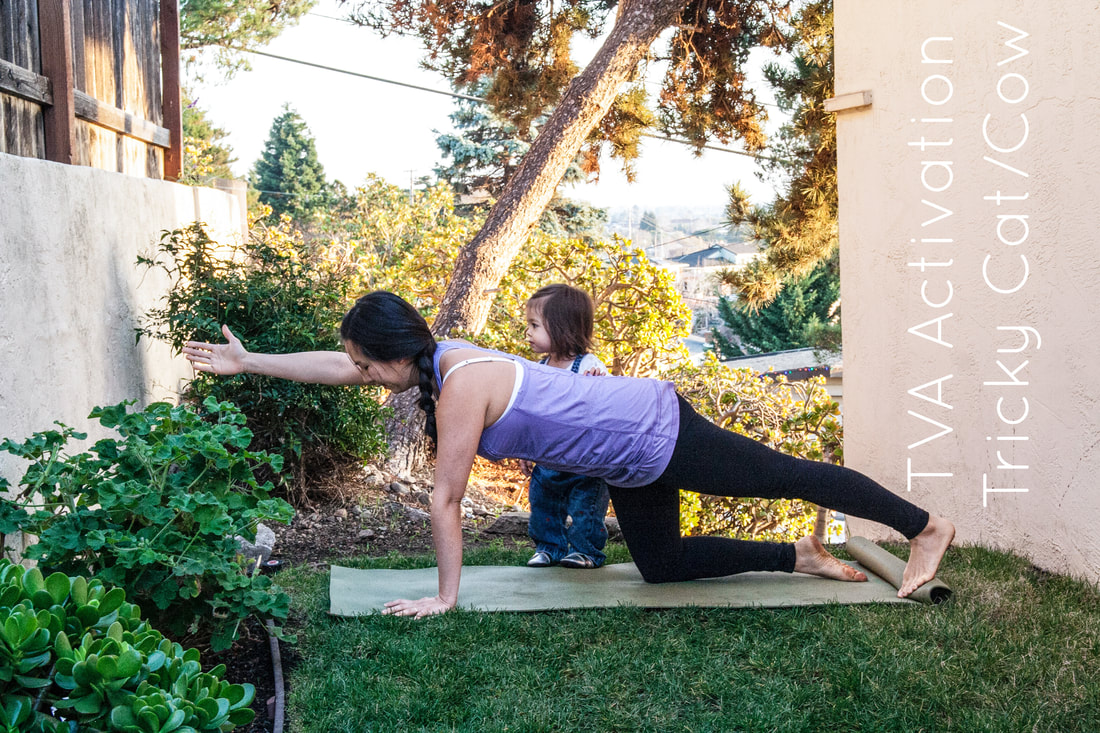
Tricky Cat-Cow/Advanced TVA Activation
|
After you feel confident finding your transverse abdominal engagement on all fours, you can challenge yourself with harder variations. Make sure to find your glutes (butt) and hamstrings (back of thigh) when you take your leg behind you:
-1 hand on finger tips -1 arm extended, opposite leg back and/or lifted -both legs back (plank) and push ups |
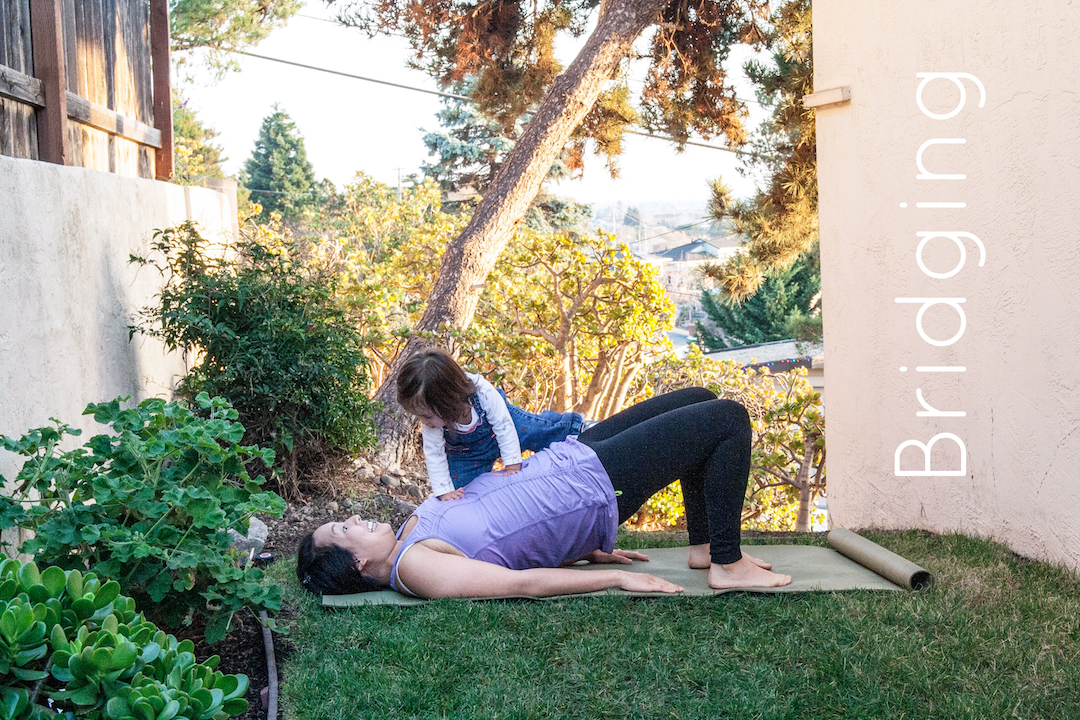
Bridging
|
Lie on your back with your feet under your hips. Shift the weight into your feet as you use your glutes (butt) and hamstrings (back of thigh) to lift your hips up. Remember to keep the bottom of your ribs in line with your pelvis (don't overly lift the chest).
If you can't feel your glutes or hamstrings, press your feet into the ground and try to pull your feet back towards your butt without actually moving them. |
Calf Stretch
|
This is best done on a half dome foam roller, but you can roll up a blanket/yoga mat or stack a few books on top of each other to get around 6 inches of lift.
Place the ball of your foot on the top of your surface with the heel down. Try to keep your weight over your back foot. If possible, step your other foot forward of your prop without taking your weight off your back foot's heel. (This is extra hard to do with a baby pulling on your leg!) |
A Note on Diastasis Recti
If you are healing a diastasis recti, it is very important to remember the alignment points as best as you can. In addition, be mindful of positions where you are rounding your back and coming up against gravity or lifting something heavy. This position of your spine under load can exacerbate your diastasis recti by increasing intra-abdominal pressure. Examples of these postures are traditional crunches, curling up to get out of bed, and bending over with a rounded spine to lift a baby, groceries, diaper bag, car seat, etc. Working on your TVA engagement, and avoiding the feeling of "bulging" or "bearing down" will help you rehabilitate your diastasis recti. If you are actively recovering from this condition, I highly suggest working one-on-one with me for a few sessions to get you on track. Surgery can often be avoided with the right rehabilitation program.

